Help:Menus
From Openbox

With regard to Openbox menus, there are two types: static menus, and dynamic or "pipe menus".
Both can be configured to extend the functionality of an Openbox installation. While static menus are built from XML files, pipe menus are written in various scripting/programming languages and can be used to provide dynamic menu content like weather, recently accessed files and RSS feeds. Pipe menus can even be combined with command-line ui toolkit utilities like zenity or kdialog to completely replicate the functionality of system tray applets like nm-applet.
Menus can further be bound to keybindings to enable the use of multiple menus in an Openbox installation. The only real constraint on your desktop experience is your scripting ability.
Contents |
Static menus are built based on content of XML files, paths to which specified in configuration file "rc.xml". The default menu file, "menu.xml", located either at "~/.config/openbox" (user-specific directory) or at "/etc/xdg/openbox" (system-wide directory) is static by default.
Syntax
A menu file must be entirely enclosed within "<openbox_menu>" and "</openbox_menu>" tags, as well as the appropriate XML declaration like so:
<?xml version="1.0" encoding="utf-8"?>
<openbox_menu xmlns="http://openbox.org/" xmlns:xsi="http://www.w3.org/2001/XMLSchema-instance" xsi:schemaLocation="http://openbox.org/ file:///usr/share/openbox/menu.xsd">
  ...menu stuff here...
</openbox_menu>
Inside these tags, menus are specified as follows:
<menu
  id="ID"
  label="TITLE"
  icon="ICON"
>

  <!-- this is a menu item, such as a program -->
  <item
    label="LABEL"
    icon="ICON"
  >
    ACTIONS
  </item>

  <!-- this is a menu header -->
  <separator
    label="Header"
  />

  <!-- this links to a sub menu -->
  <menu
    id="ID"
  />

  <!-- this is a horizontal line -->
  <separator />

  <!-- this also links to a sub menu, which is defined inline -->
  <menu
    id="ID"
    label="TITLE"
    icon="ICON"
  >
    <item
      label="LABEL"
      icon="ICON"
    >
      ACTIONS
    </item>
  </menu>

  <separator />

  <!-- this is a menu item -->
  <item
    label="LABEL"
    icon="ICON"
  >
    ACTIONS
  </item>

</menu>
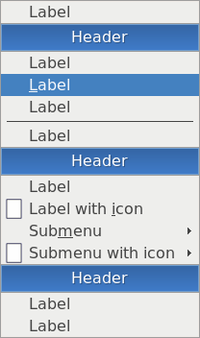
The example above shows how to put entries into a menu (with "<item>" and "</item>" tags), and two methods to add submenus to a menu (with "<menu>" and "</menu>" tags). It also shows how to put menu headers and separators (with "<separator />" tag) into the menu to group items together without submenus.
Value of attribute "id"
Each menu must be given an id, which is a unique identifier of the menu. This id is used to refer to the menu in a ShowMenu action.
Value if attribute "title"
The value of attribute title of the menu is shown, when you link to the menu as a submenu. The title will appear in its parent menu.
Value of attribute "label"
The value of attribute label of an "item" element is the visible name of the menu item. In the "separator" element, the label attribute transforms the separator from a small horizontal line to a menu header with the given text in it.
The first character in the label is used for a keyboard shortcut to directly use the menu item. This can be overridden by using the "_" character in front of the character, you wish to use for the shortcut. For example, "The _shortcut" would make "s" the shortcut key for this menu item. If you want a "_" character to appear in the string, you can use two underscores together, such as in "An __ underscore".
Value of attribute "icon"
The value of attribute icon is path to the image file. Image will be drawn left of menu item label or submenu label. Supported formats of images is the same, as formats, supported by libraries "Imlib2" (xpm, gif, jpeg, png) and "librsvg" (svg). Example:
<item
  label="Vim"
  icon="/usr/share/pixmaps/vim-32.xpm"
>
  <action
    name="Execute"
  >
    <execute>x-terminal-emulator -T Vim -e vim</execute>
  </action>
</item>
If user doesn't want to display icons in menus, he/she can disable icons inside "menu" element in "rc.xml" file:
<menu>
  ...
  <showIcons>no</showIcons>
  <!-- Default value is "yes". -->
  ...
</menu>
Actions
The ACTIONS are zero or more actions, which are executed in order, when you select the menu item. Typically, in menus, these are Execute actions, which run commands.
Pipe menus are menus generated dynamically based on output of scripts, they are so-called since the script's output is piped to the given Openbox menu. A number of scripts used to generate pipe menus are available through the pipe menus page.
A pipe menu can be created by placing the following code into a menu file, such as "menu.xml":
<?xml version="1.0" encoding="utf-8"?>
<openbox_menu xmlns="http://openbox.org/" xmlns:xsi="http://www.w3.org/2001/XMLSchema-instance" xsi:schemaLocation="http://openbox.org/ file:///usr/share/openbox/menu.xsd">
 ...menu stuff here...
 <menu
   id="ID"
   label="TITLE"
   execute="COMMAND"
 />
</openbox_menu>
Thereafter the pipe menu can be referenced by ID just like static menu.
Command
The COMMAND is the command to be executed by Openbox. Each time action ShowMenu is executed Openbox will do the following steps:
- run specified command;
- read output of command;
- show the menu on the screen.
The stdout (output) of the script should be XML, something like:
<openbox_pipe_menu>
  <item
    label="LABEL"
    icon="ICON"
  >
    ACTIONS
  </item>
</openbox_pipe_menu>
When writing your own scripts, make sure to escape xml special characters, such as "&" ("&"), "<" ("<"), ">" (">") and other (see more on Wikipedia).
Source installs or prepackaged .debs from openbox.org will not configure your setup to show the Debian menu. There are a few simple steps to get it working.